

METHODOLOGY
i. Change the Resistor Box Values in Astable Multivibrator
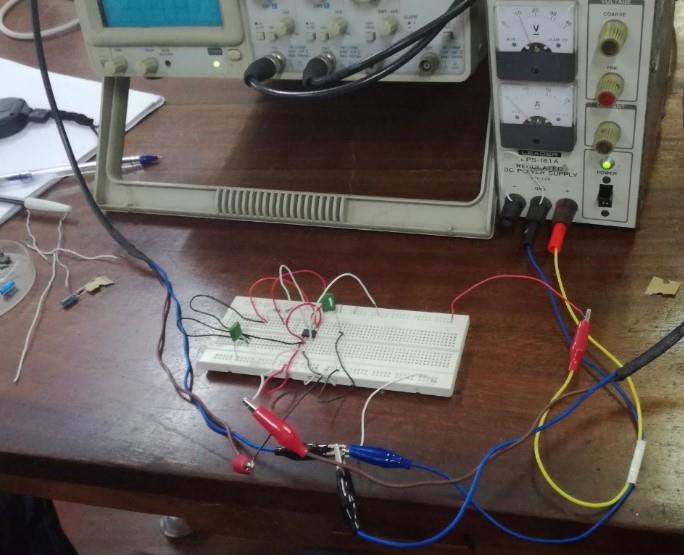
Step 01
The NE555 IC was connected to the bread boar.
Step 02
Next, the first pin was connected to the power supply negative terminal by using jumper wires.
Step 03
Then, the 0.1μF Capacitor positive terminal was connected to the fifth pin of the NE555 IC and negative terminal was connected to the power supply negative terminal by using jumper wire.
Step 04
Another 0.1μF Capacitor positive terminal was connected to the second pin of the IC and negative terminal was connected to the power supply negative terminal by using jumper wires.
Step 05
The fourth pin and eighth pin were connected together and connected to the power supply positive terminal by using jumper wires.
Step 06
The 1kΩ resistor one terminal was connected to the sixth pin of 555IC and other terminal connected to the seventh pin. Sixth pin connected to the 0.1μF Capacitor which connected to the second pin by using jumper wire.
Step 07
After that, another 1kΩ resistor one terminal was connected to the seventh pin of 555 IC and other terminal was connected to the power supply positive terminal by using jumper wires.
Step 08
The oscilloscope was calibrated to both CH1 and CH2.
Step 09
The third pin (output) was connected to the CH1 probe positive terminal by using jumper wire and CH1 negative terminal was connected to the power supply negative terminal by using jumper wires.
Step 10
The CH 2 probe positive terminal was connected to the second pin of IC by using jumper wires and negative terminal was connected to the power supply negative terminal.

Step 11
Then, switch ON the power supply and observed the wave form appeared in the oscilloscope and got the on-time, off time and frequency reading in oscilloscope X axis with uncertainty.
Step 12
The 1kΩ resistors were replaced by using 10 kΩ, 47 kΩ, 100 kΩ and 560 kΩ. After that switch ON the power supply and observed the wave form appeared in the oscilloscope and got the on-time, off time and frequency reading in oscilloscope X axis with uncertainty.
ii. Change the Capacitor Value of the Astable Multivibrator
The 0.1μF Capacitor were replaced by using 0.47μF Capacitor. After that switch ON the power supply and observed the wave form appeared in the oscilloscope and got the on-time, off time and frequency reading in oscilloscope X axis with uncertainty.
iii. Oscilloscope replaced by LED
Removed the oscilloscope from the output (third pin) and connected LED to the third pin series with 1kΩ resistors and observed the output pattern of the circuit.
See You with next part.
Laahiru C.Fernando.
Astable Operation (Astable Multivibrator)
i. Change the Resistor Box Values in Astable Multivibrator
Step 01
The NE555 IC was connected to the bread boar.
Step 02
Next, the first pin was connected to the power supply negative terminal by using jumper wires.
Step 03
Then, the 0.1μF Capacitor positive terminal was connected to the fifth pin of the NE555 IC and negative terminal was connected to the power supply negative terminal by using jumper wire.
Step 04
Another 0.1μF Capacitor positive terminal was connected to the second pin of the IC and negative terminal was connected to the power supply negative terminal by using jumper wires.
Step 05
The fourth pin and eighth pin were connected together and connected to the power supply positive terminal by using jumper wires.
Step 06
The 1kΩ resistor one terminal was connected to the sixth pin of 555IC and other terminal connected to the seventh pin. Sixth pin connected to the 0.1μF Capacitor which connected to the second pin by using jumper wire.
Step 07
After that, another 1kΩ resistor one terminal was connected to the seventh pin of 555 IC and other terminal was connected to the power supply positive terminal by using jumper wires.
Step 08
The oscilloscope was calibrated to both CH1 and CH2.
Step 09
The third pin (output) was connected to the CH1 probe positive terminal by using jumper wire and CH1 negative terminal was connected to the power supply negative terminal by using jumper wires.
Step 10
The CH 2 probe positive terminal was connected to the second pin of IC by using jumper wires and negative terminal was connected to the power supply negative terminal.
Step 11
Then, switch ON the power supply and observed the wave form appeared in the oscilloscope and got the on-time, off time and frequency reading in oscilloscope X axis with uncertainty.
Step 12
The 1kΩ resistors were replaced by using 10 kΩ, 47 kΩ, 100 kΩ and 560 kΩ. After that switch ON the power supply and observed the wave form appeared in the oscilloscope and got the on-time, off time and frequency reading in oscilloscope X axis with uncertainty.
ii. Change the Capacitor Value of the Astable Multivibrator
The 0.1μF Capacitor were replaced by using 0.47μF Capacitor. After that switch ON the power supply and observed the wave form appeared in the oscilloscope and got the on-time, off time and frequency reading in oscilloscope X axis with uncertainty.
iii. Oscilloscope replaced by LED
Removed the oscilloscope from the output (third pin) and connected LED to the third pin series with 1kΩ resistors and observed the output pattern of the circuit.
See You with next part.
Laahiru C.Fernando.


No comments:
Post a Comment